Accessing a specific activity allows a complete view of the content, in addition to enabling you to insert and change information according to your user permission. Let’s get to know it:
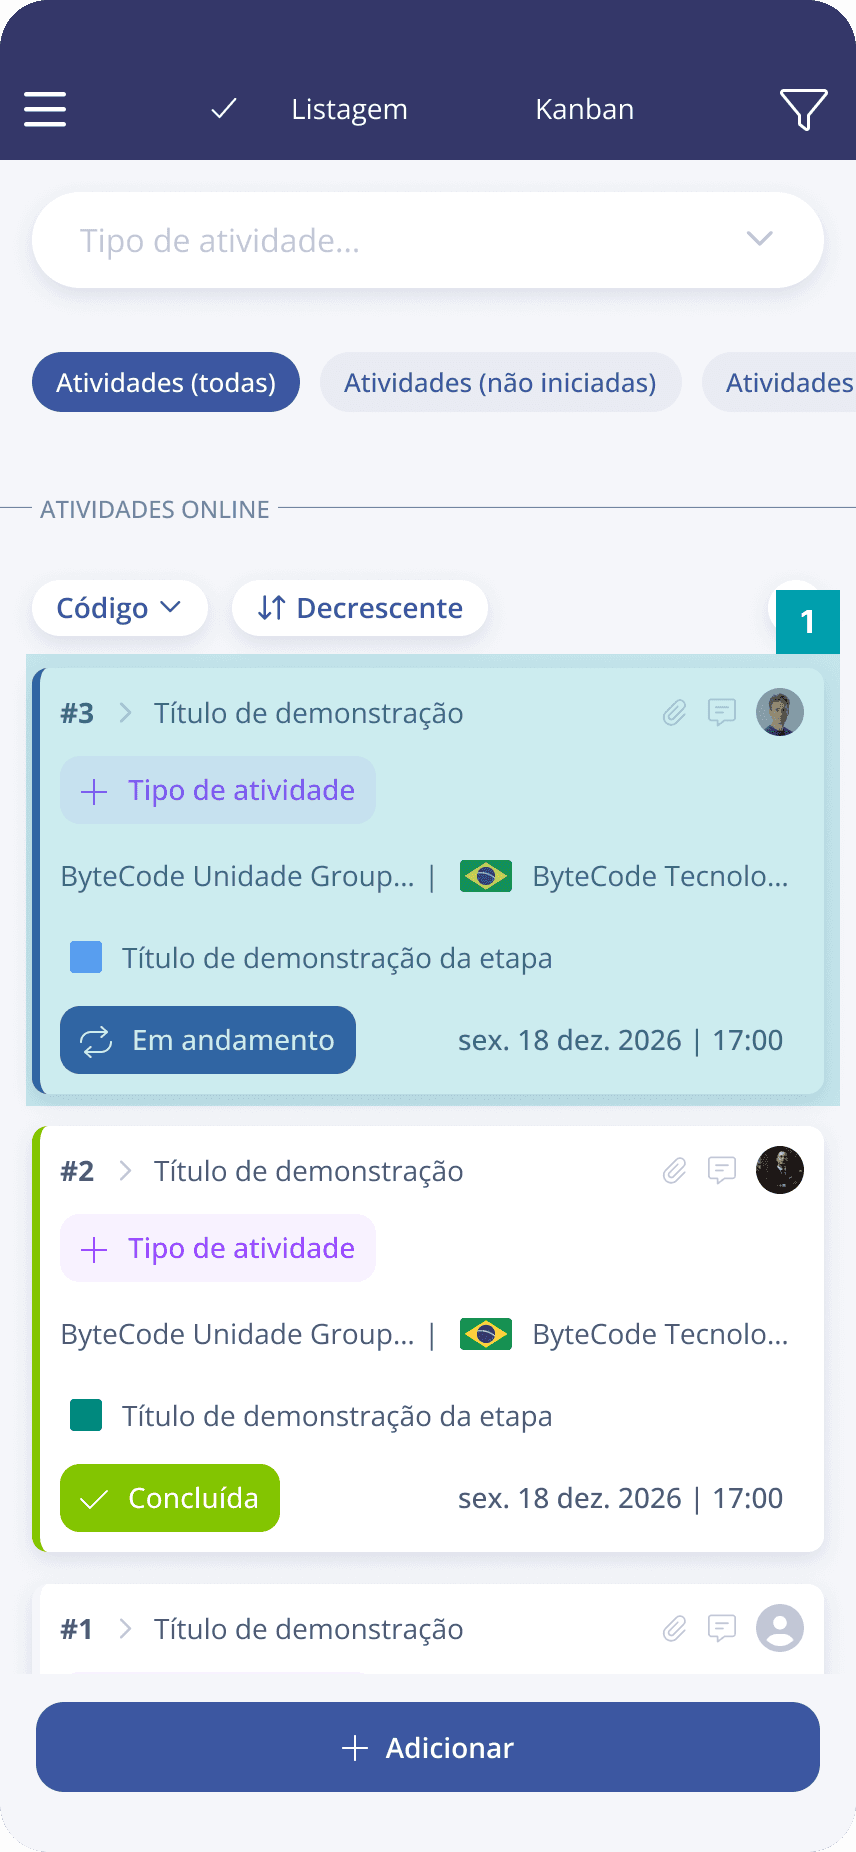
To open an activity, just click the card of the desired activity in the list.
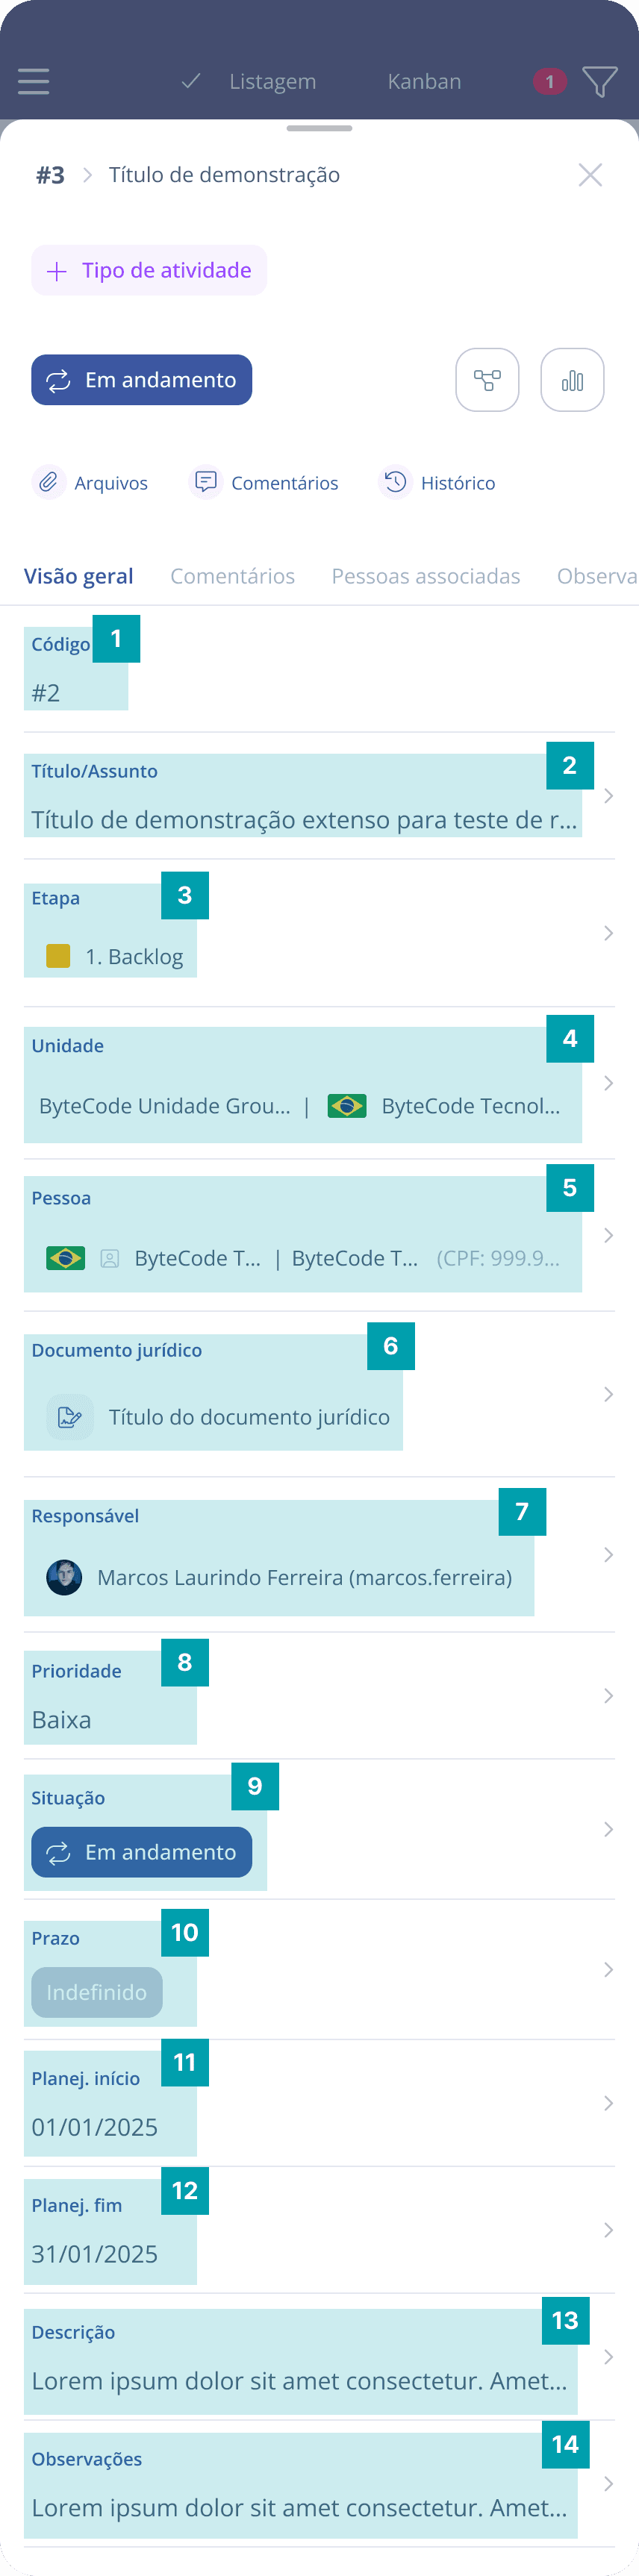
Details panel
The first panel in an activity overview is called Details. This panel has fixed fields, meaning the same fields will be present in all activities. The fields that compose it are:
Code – Informs the activity identification code.
Title – Informs the title/subject given to the activity.
Stage – Informs which stage of the flow the activity is in.
Contract//Unit – Informs which company contract or unit the activity is linked to.
Person – Informs the company person related to the activity.
Legal Document – Informs the legal document associated with the activity.
Responsible – Informs the activity’s current responsible user.
Priority – Informs the activity priority level.
Status – Informs the current status of the activity, which can be: (Not started, In progress, Completed, or Canceled).
Deadline – Informs the activity delivery deadline date and time.
Planning start date – Informs the activity planning start date.
Planning end date – Informs the date when activity planning was completed.
Description – Field that informs the activity description.
Notes – Informs the notes assigned to the activity.
Important: The information contained in the list and in an activity overview is presented according to the access permissions you have as a Blue Service platform user.
Dynamic fields panel
Unlike fixed fields, dynamic fields are basically alternative fields that can be configured and associated with a certain activity type through the web platform. This makes it possible to customize fields for your activity form, so form information becomes specific and enables assertive management, focusing on collecting essential information for task execution. Dynamic field panels are arranged right below the details panel and have several field types; let’s get to know them:
Dynamic field category – Informs the title of the dynamic fields panel; it can be configured on the web platform.
Multiple choice – Presents alternatives; more than one can be selected if necessary.
Single choice – Presents alternatives; only one can be selected.
File – Uploads a file; allows selecting a file from the device or taking a photo in real time. Accepts traditional file formats.
Digital signature – Has a signature layout that can be filled out with a finger touch or a touch pen. Ideal for documenting and formalizing operations.
ZIP code – Presents the correct format and character limit for documenting ZIP code numbers.
Person – Allows searching for and adding a person registered on the platform.
Date – Informs the entered date in xx/xx/xxxx format.
Date and Time – Allows entering a date associated with a time for more precise information. The format is: xx/xx/xxxx xx:xx.
Email – Presents the ideal format for documenting an email address, includes format validation to avoid errors when adding or editing information.
Gallery – Uploads multiple files at once, ideal for documenting evidence.
Time – Informs the entered time in xx:xx format.
Decimal number – Presents numbers with decimal places after the comma, ideal for entering fractional numbers.
Integer number – Presents only whole numbers, ideal for entering quantities.
Currency number – Presents automatic punctuation (dot or comma), ideal for declaring financial values.
Percentage number – Presents a percentage symbol, ideal for informing percentage values.
Phone – Presents a phone number format, enabling you to register tags, notes, and organize phone numbers assertively.
Short text – Allows adding text with a small number of characters.
Long text – Allows adding text with a large number of characters.
User – Allows searching for and adding a system user to the form.
Important note! Dynamic fields are customized with names chosen by the company contracting the system, that is, a field of type “currency number” may appear in your activity as: “Budget Value,” for example. They can also be separated by categories (item 1), meaning there will be more than one dynamic fields panel to fill out. Despite customization, knowing the field types your form may contain is very important for the quality of your completion and even to improve your form.
Associated people panel
The associated people panel is arranged right below the dynamic fields; its main function is to show which user created the specific activity and who is currently responsible for it.
Shows the user who created the activity.
Shows the current person responsible for the activity.
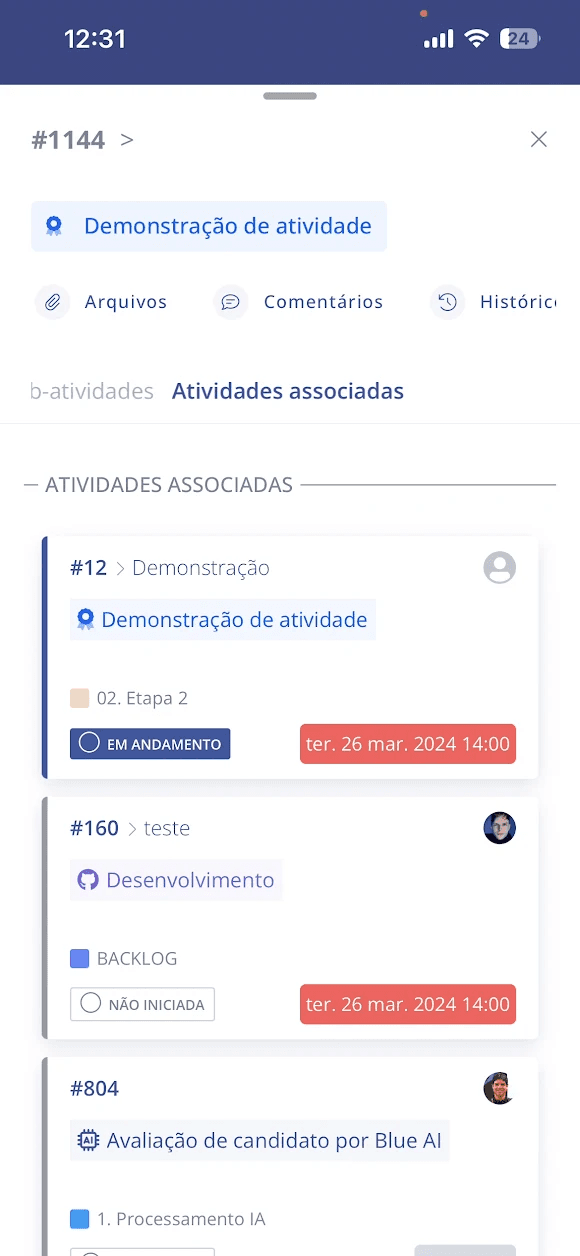
Associated activities panel
One activity can be associated with another. This relationship occurs when we have activities that depend on other activities to be carried out, or that contribute to the execution of another activity; (the association between activities is done through the web platform). This panel presents, through a list, the activities that are related:
The list presents summarized data of the associated activity.
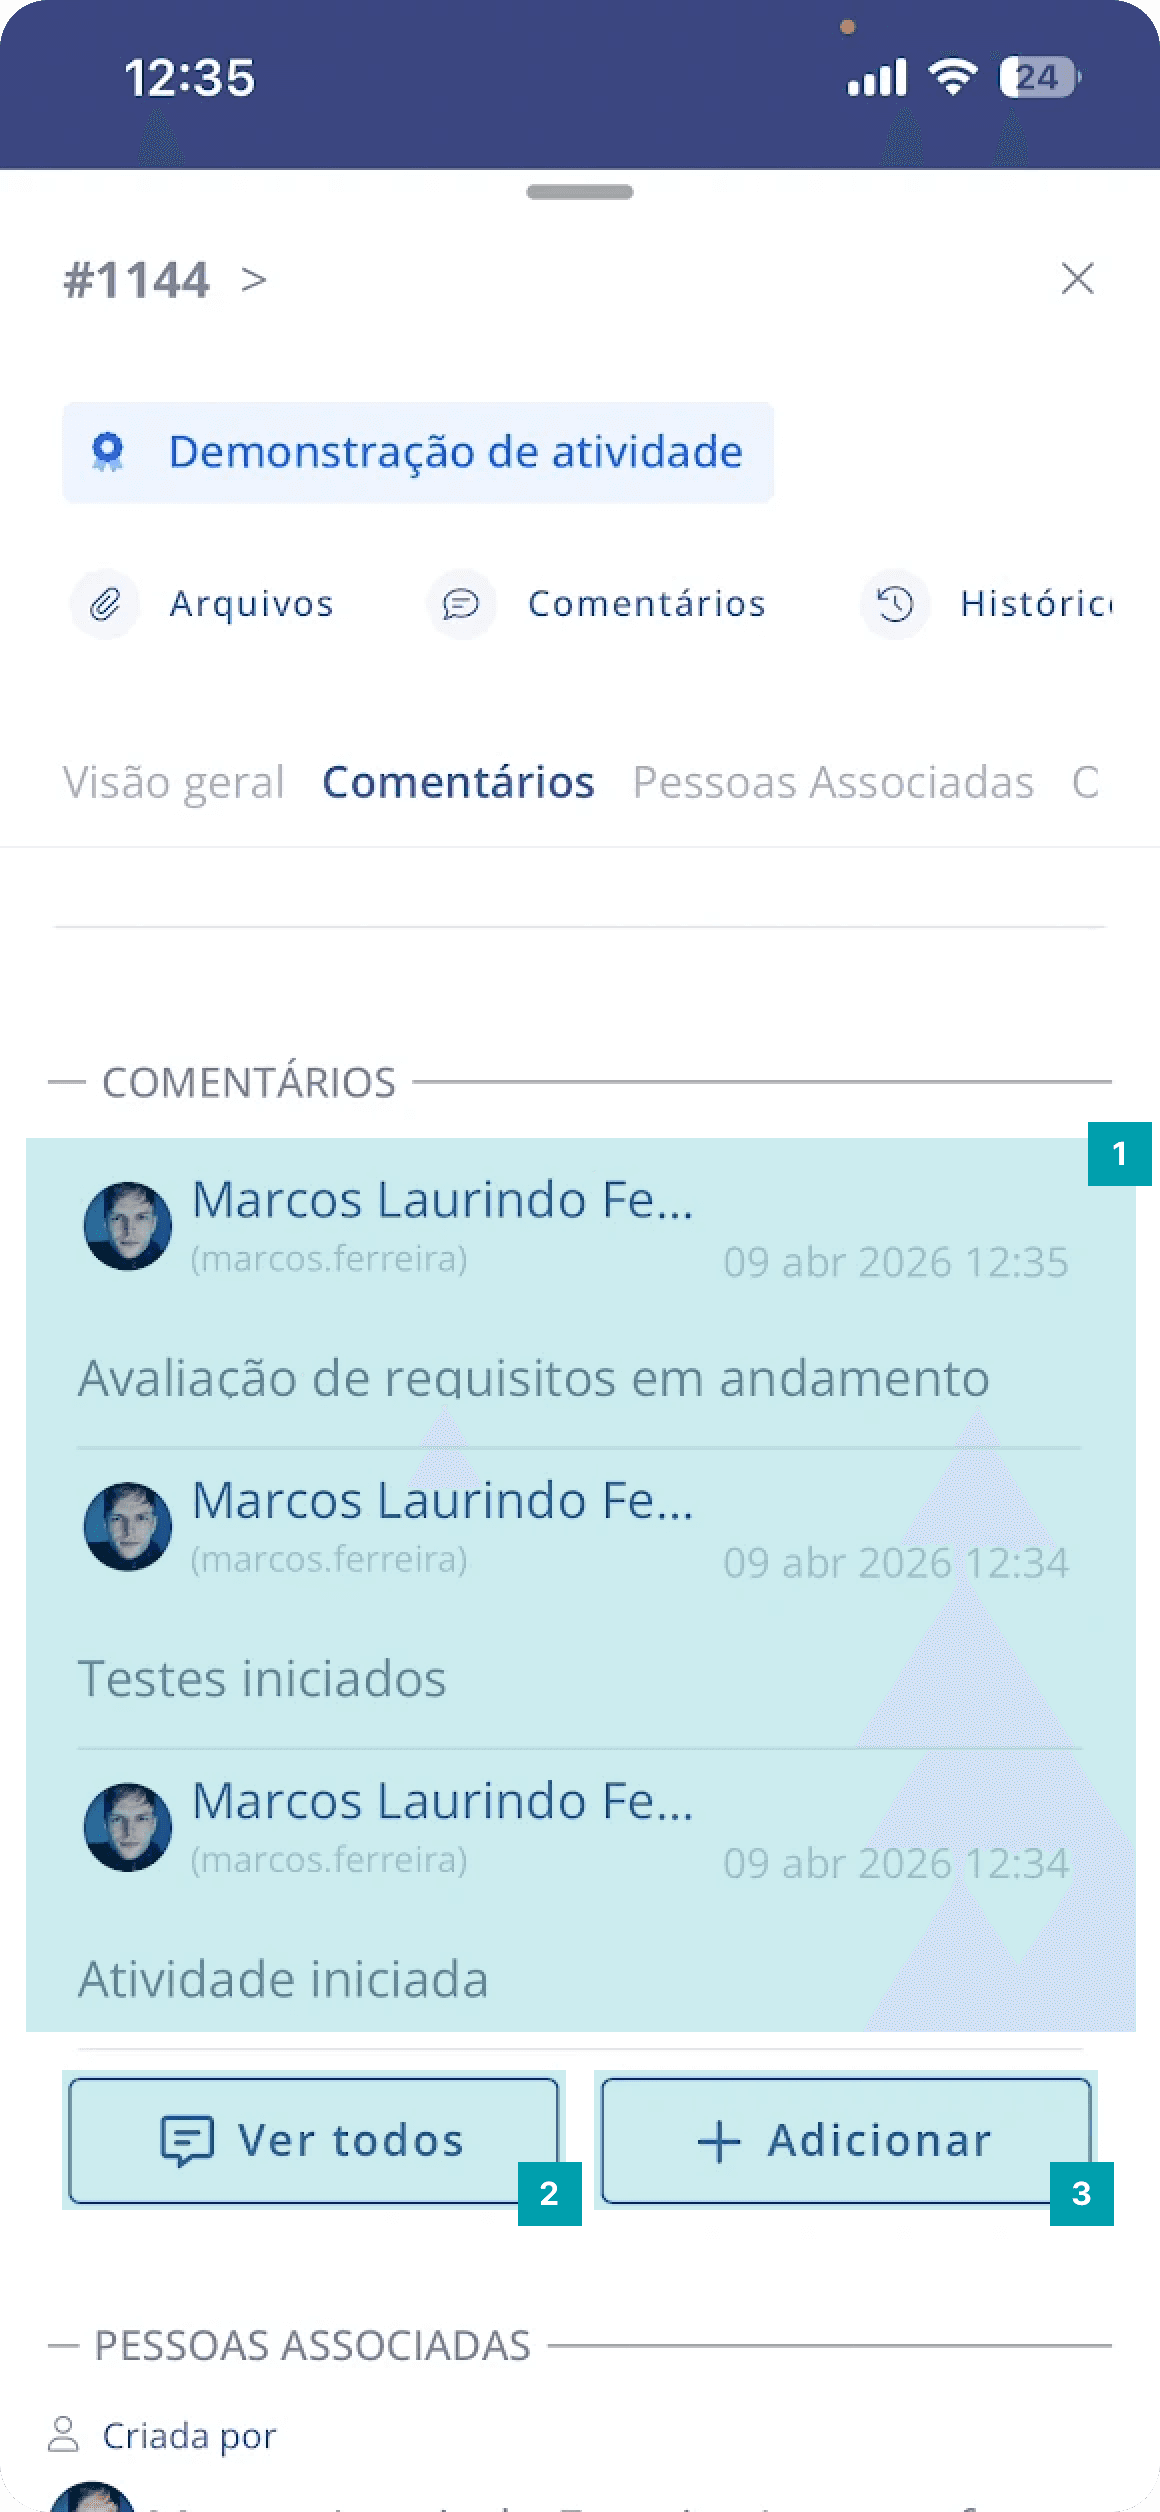
Comments panel
The comments panel is widely used in the Blue Service platform. As its own name says, this panel is used to record and document comments in the activity. Comment posts are separate from the form fields and enable better communication among activity participants.
Activity comments – Informs the last 3 comments added to the activity
View all – When clicked, opens a modal listing all activity comments
Add – When clicked, opens a modal with a form to add comments to the activity
This modal lists all comments added to the activity.
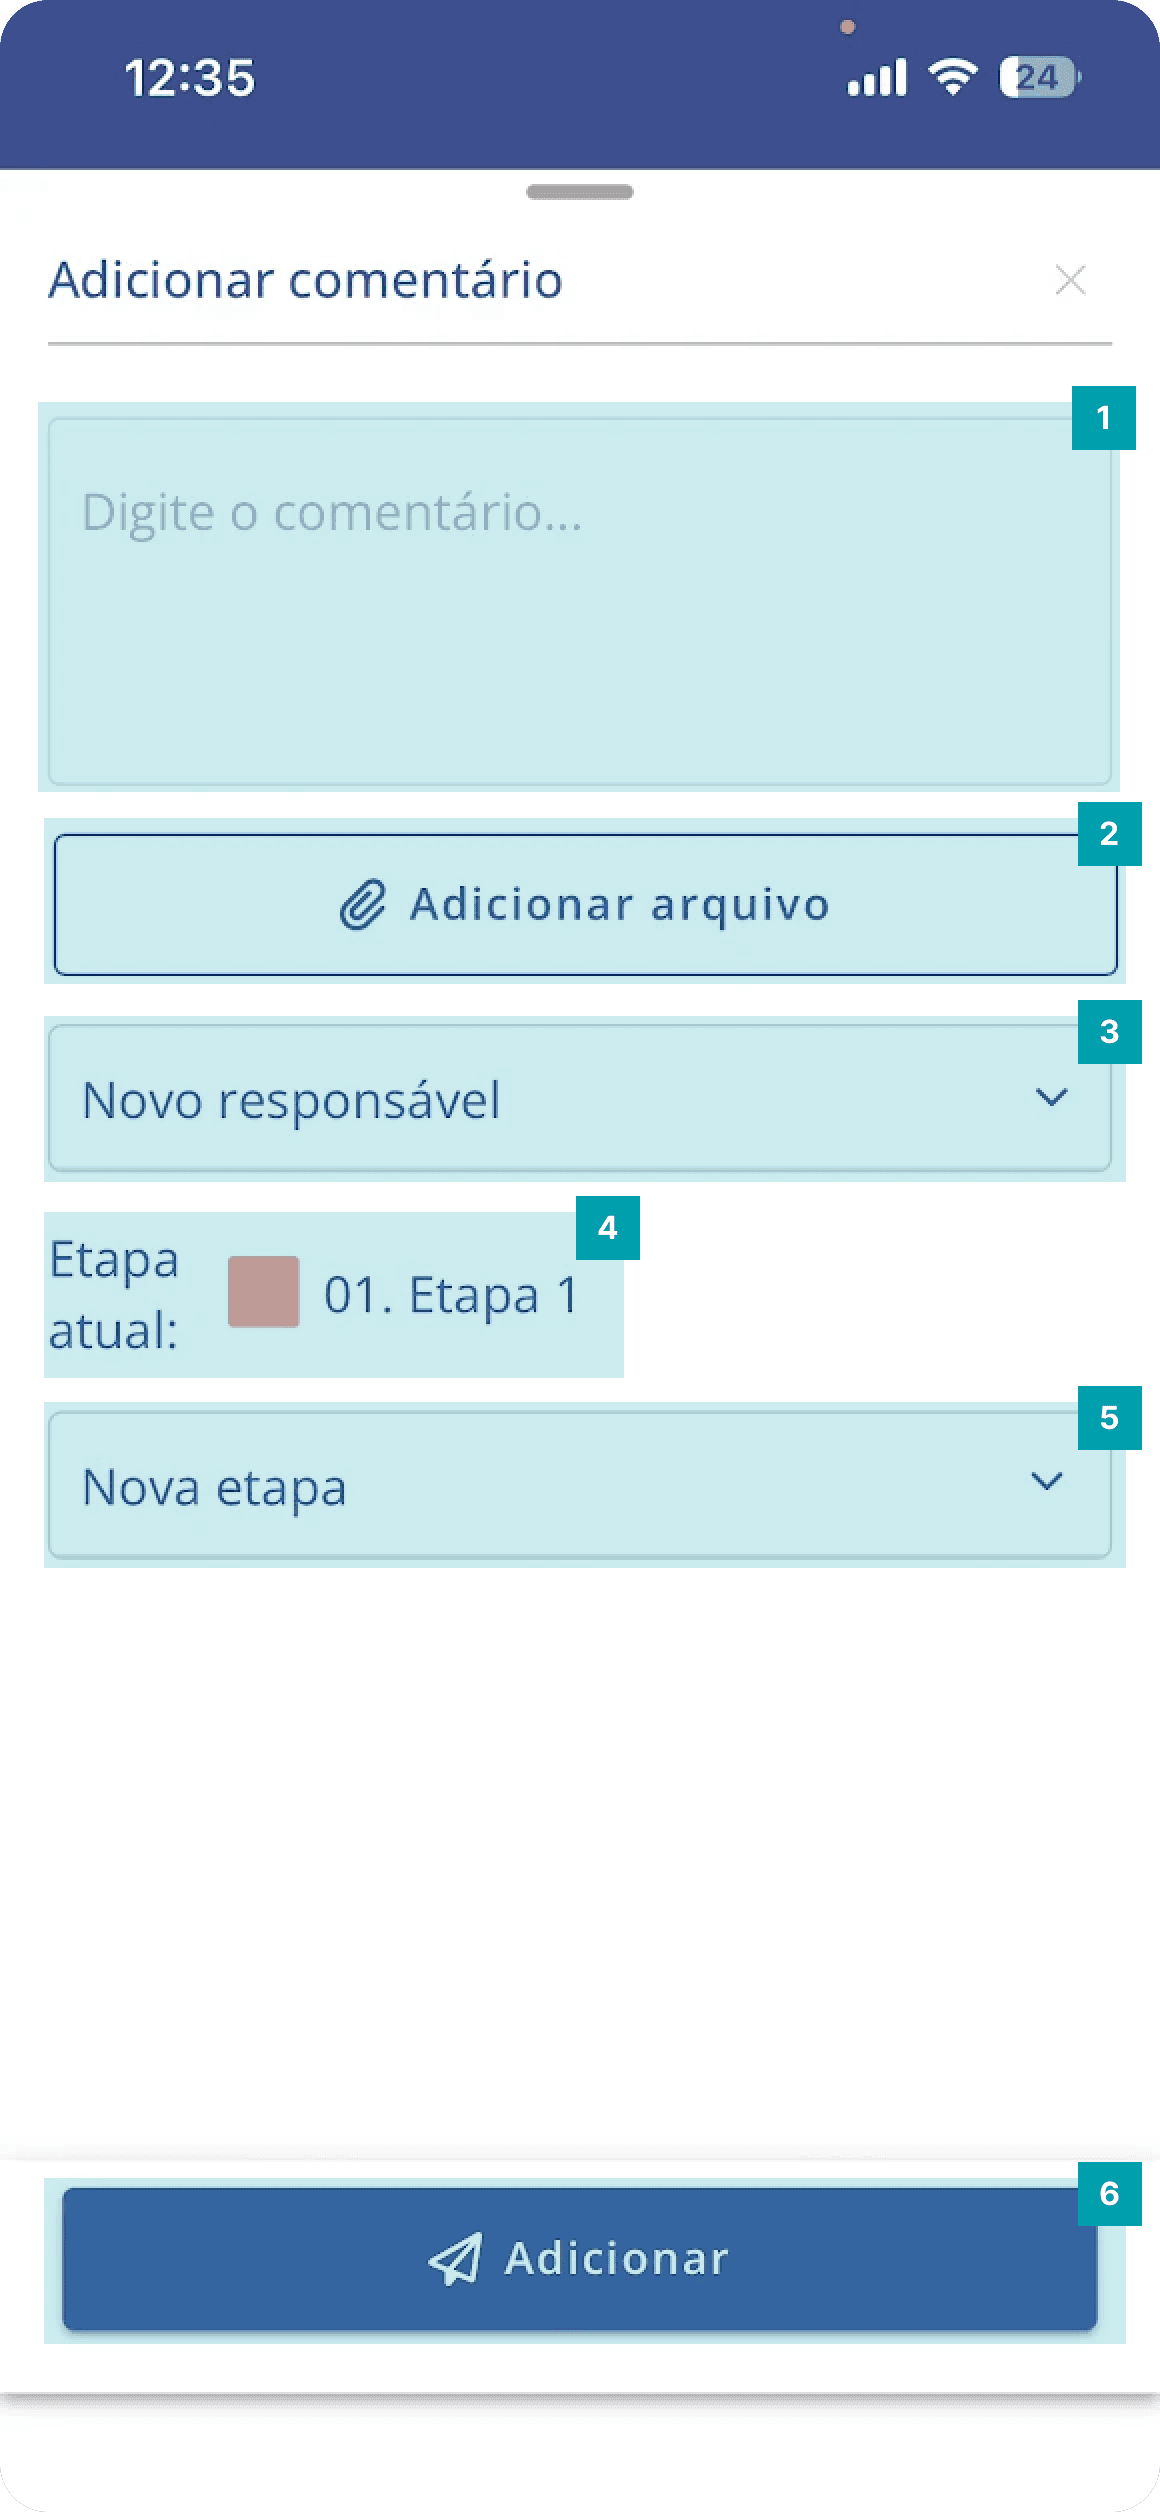
This is the modal shown when clicking Add, containing the following fields:
Long text – field to type free text
Add file – when clicked, you can attach a file to the comment
New responsible – allows defining a new person responsible for the activity.
Current stage – informs the current stage where the activity is.
New stage – allows defining a new stage for the activity.
Add – when clicked, the comment will be added to the activity.
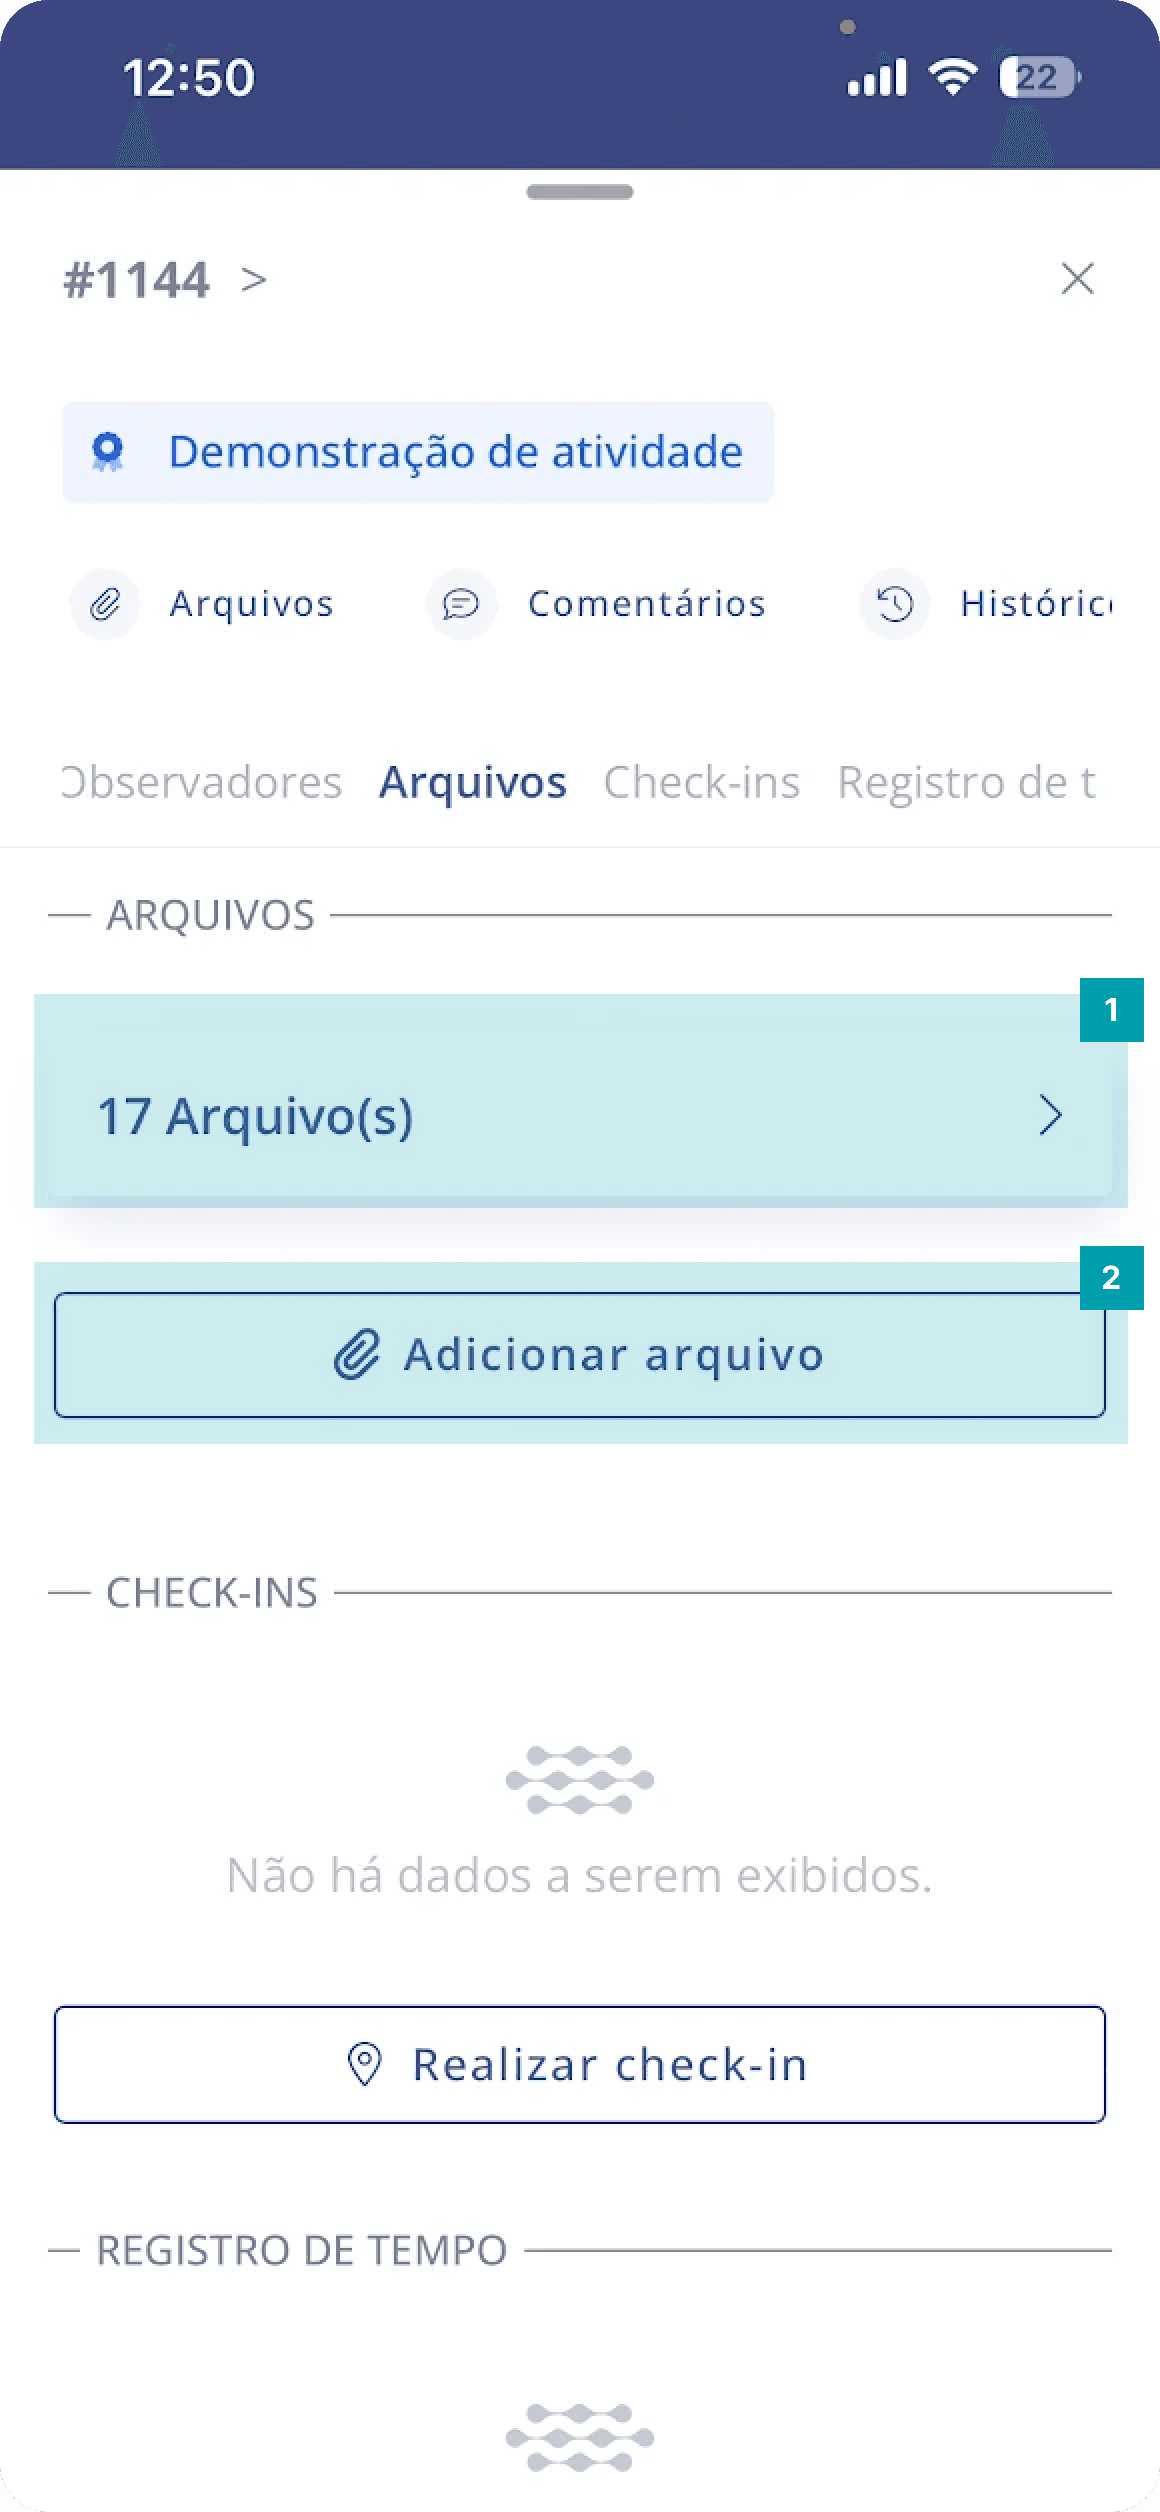
Files panel
The files panel’s main function is documenting files of various formats that help monitor and execute the activity. Here you can upload audio, video, images, among others. Uploading is very simple; let’s see:
Files card – informs the total number of files in the activity.
Add file – when clicked, a pop-up opens with file options that can be added to the activity (photo, video, gallery, or file).
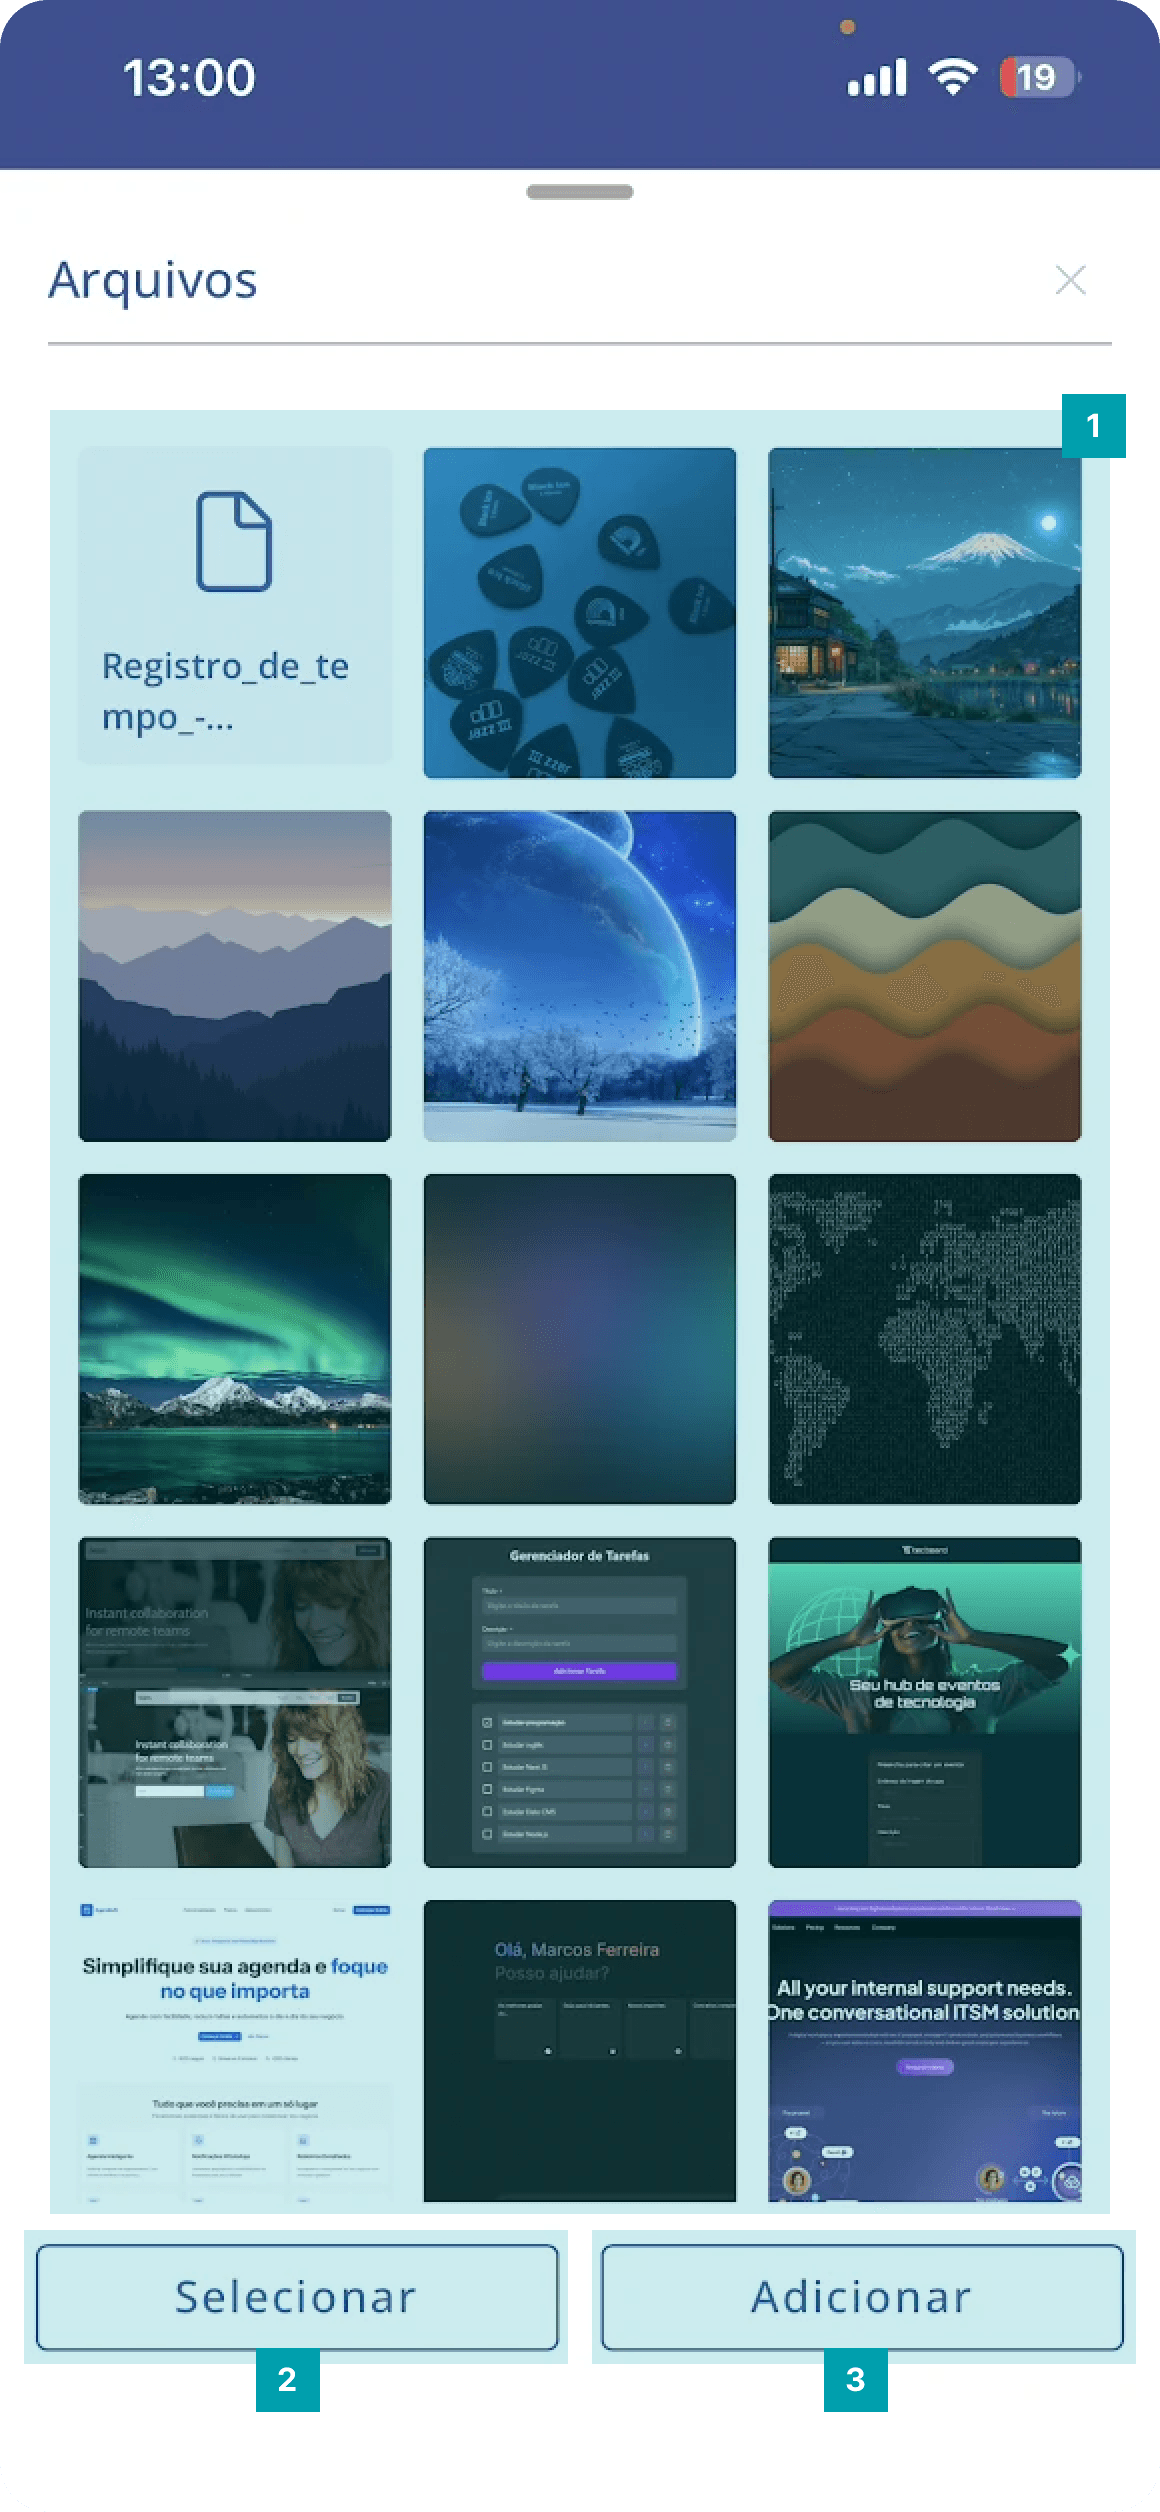
Files grid – displays all activity files.
Select – when clicked, it will be possible to select one or more files.
Add – when clicked, a pop-up opens with file options that can be added to the activity (photo, video, gallery, or file).
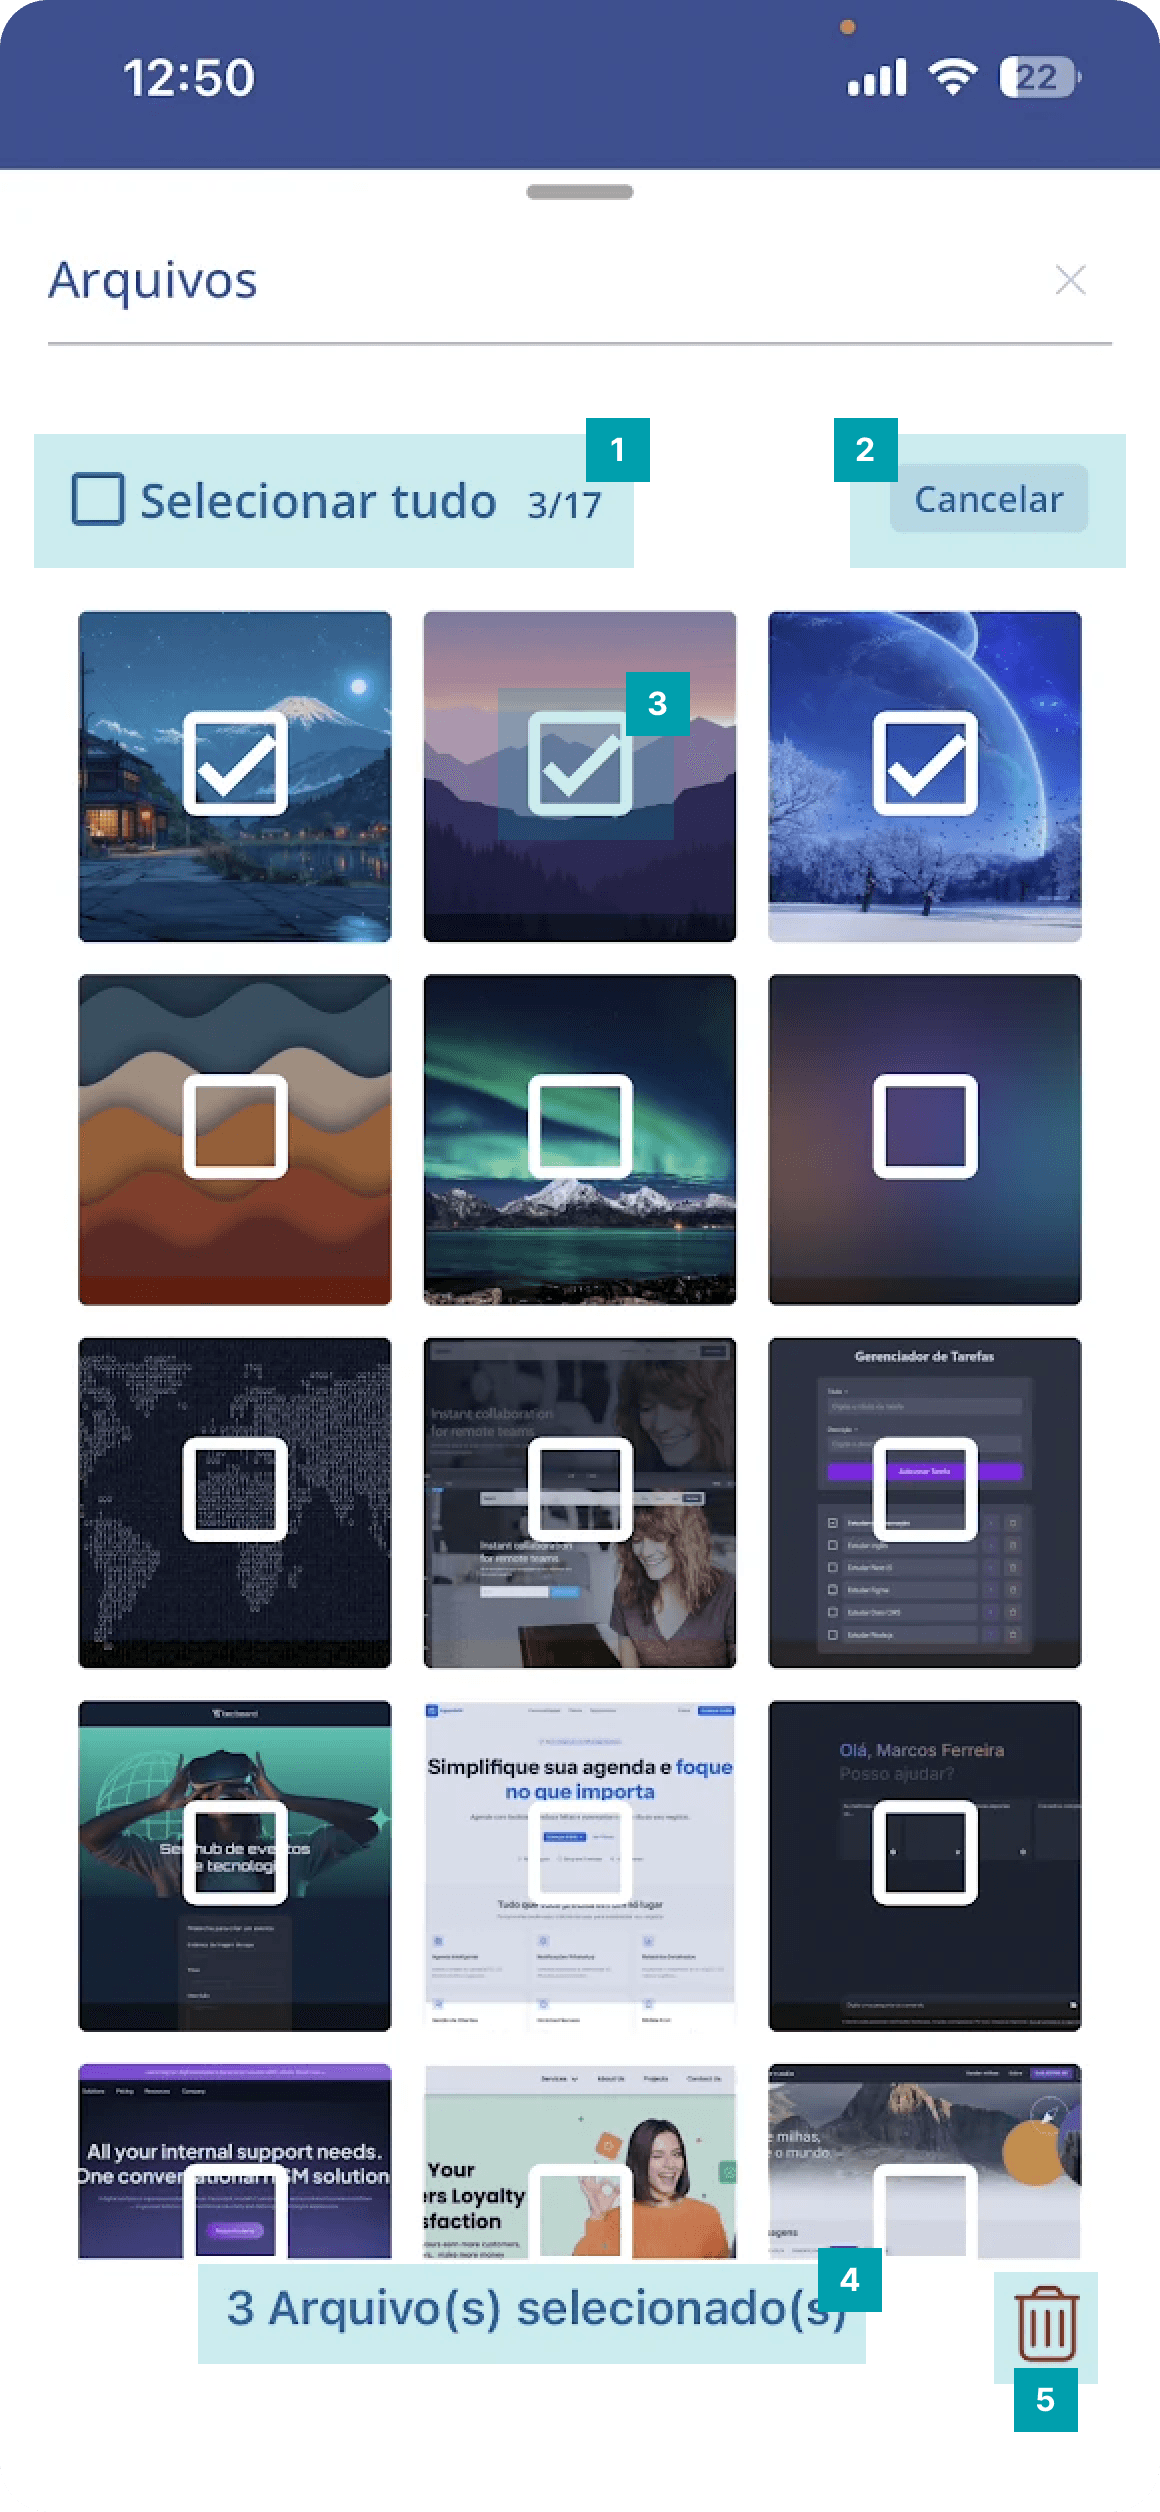
After clicking Select, the files modal looks like this:
Displays the number of selected files x total files, allowing you to select or remove the entire selection by clicking the checkbox.
Allows canceling the action of selecting files
A checkbox is shown on each file so you can select one or more files
Informs the number of selected files
Button to remove selected files
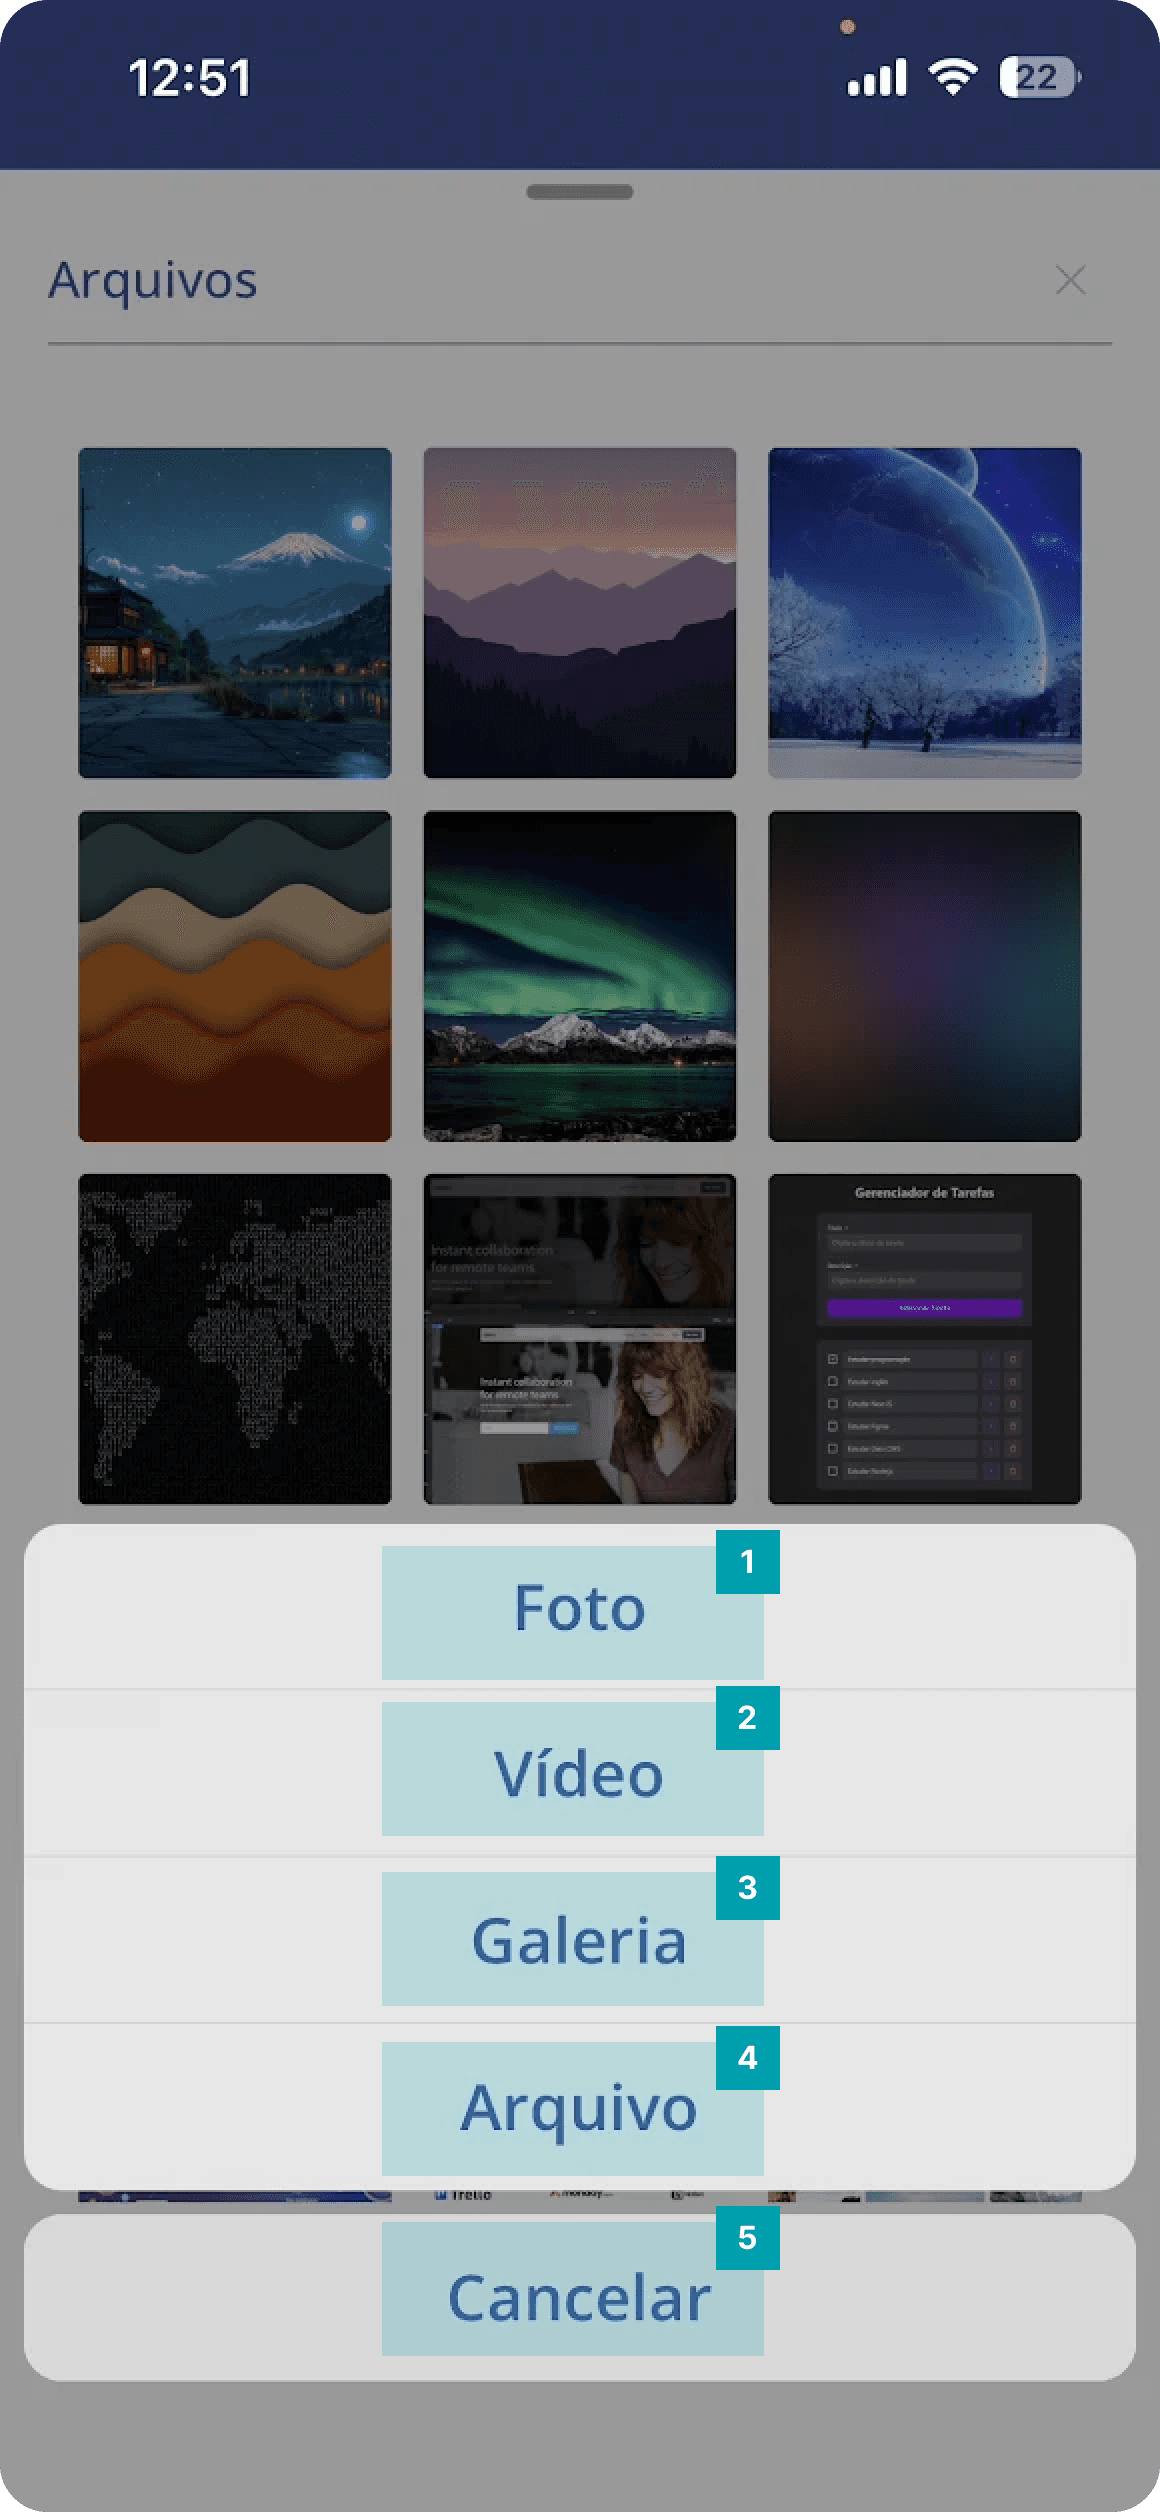
After clicking Add, a pop-up opens with the following options:
Photo – opens the device camera, allowing you to take a photo in real time.
Video – opens the device camera, allowing you to record a video in real time.
Gallery – opens the device photo gallery, allowing you to add images or videos
File – opens the device files folder, allowing you to add pdf, excel, word files
Cancel – cancels the action of adding a file and closes the pop-up
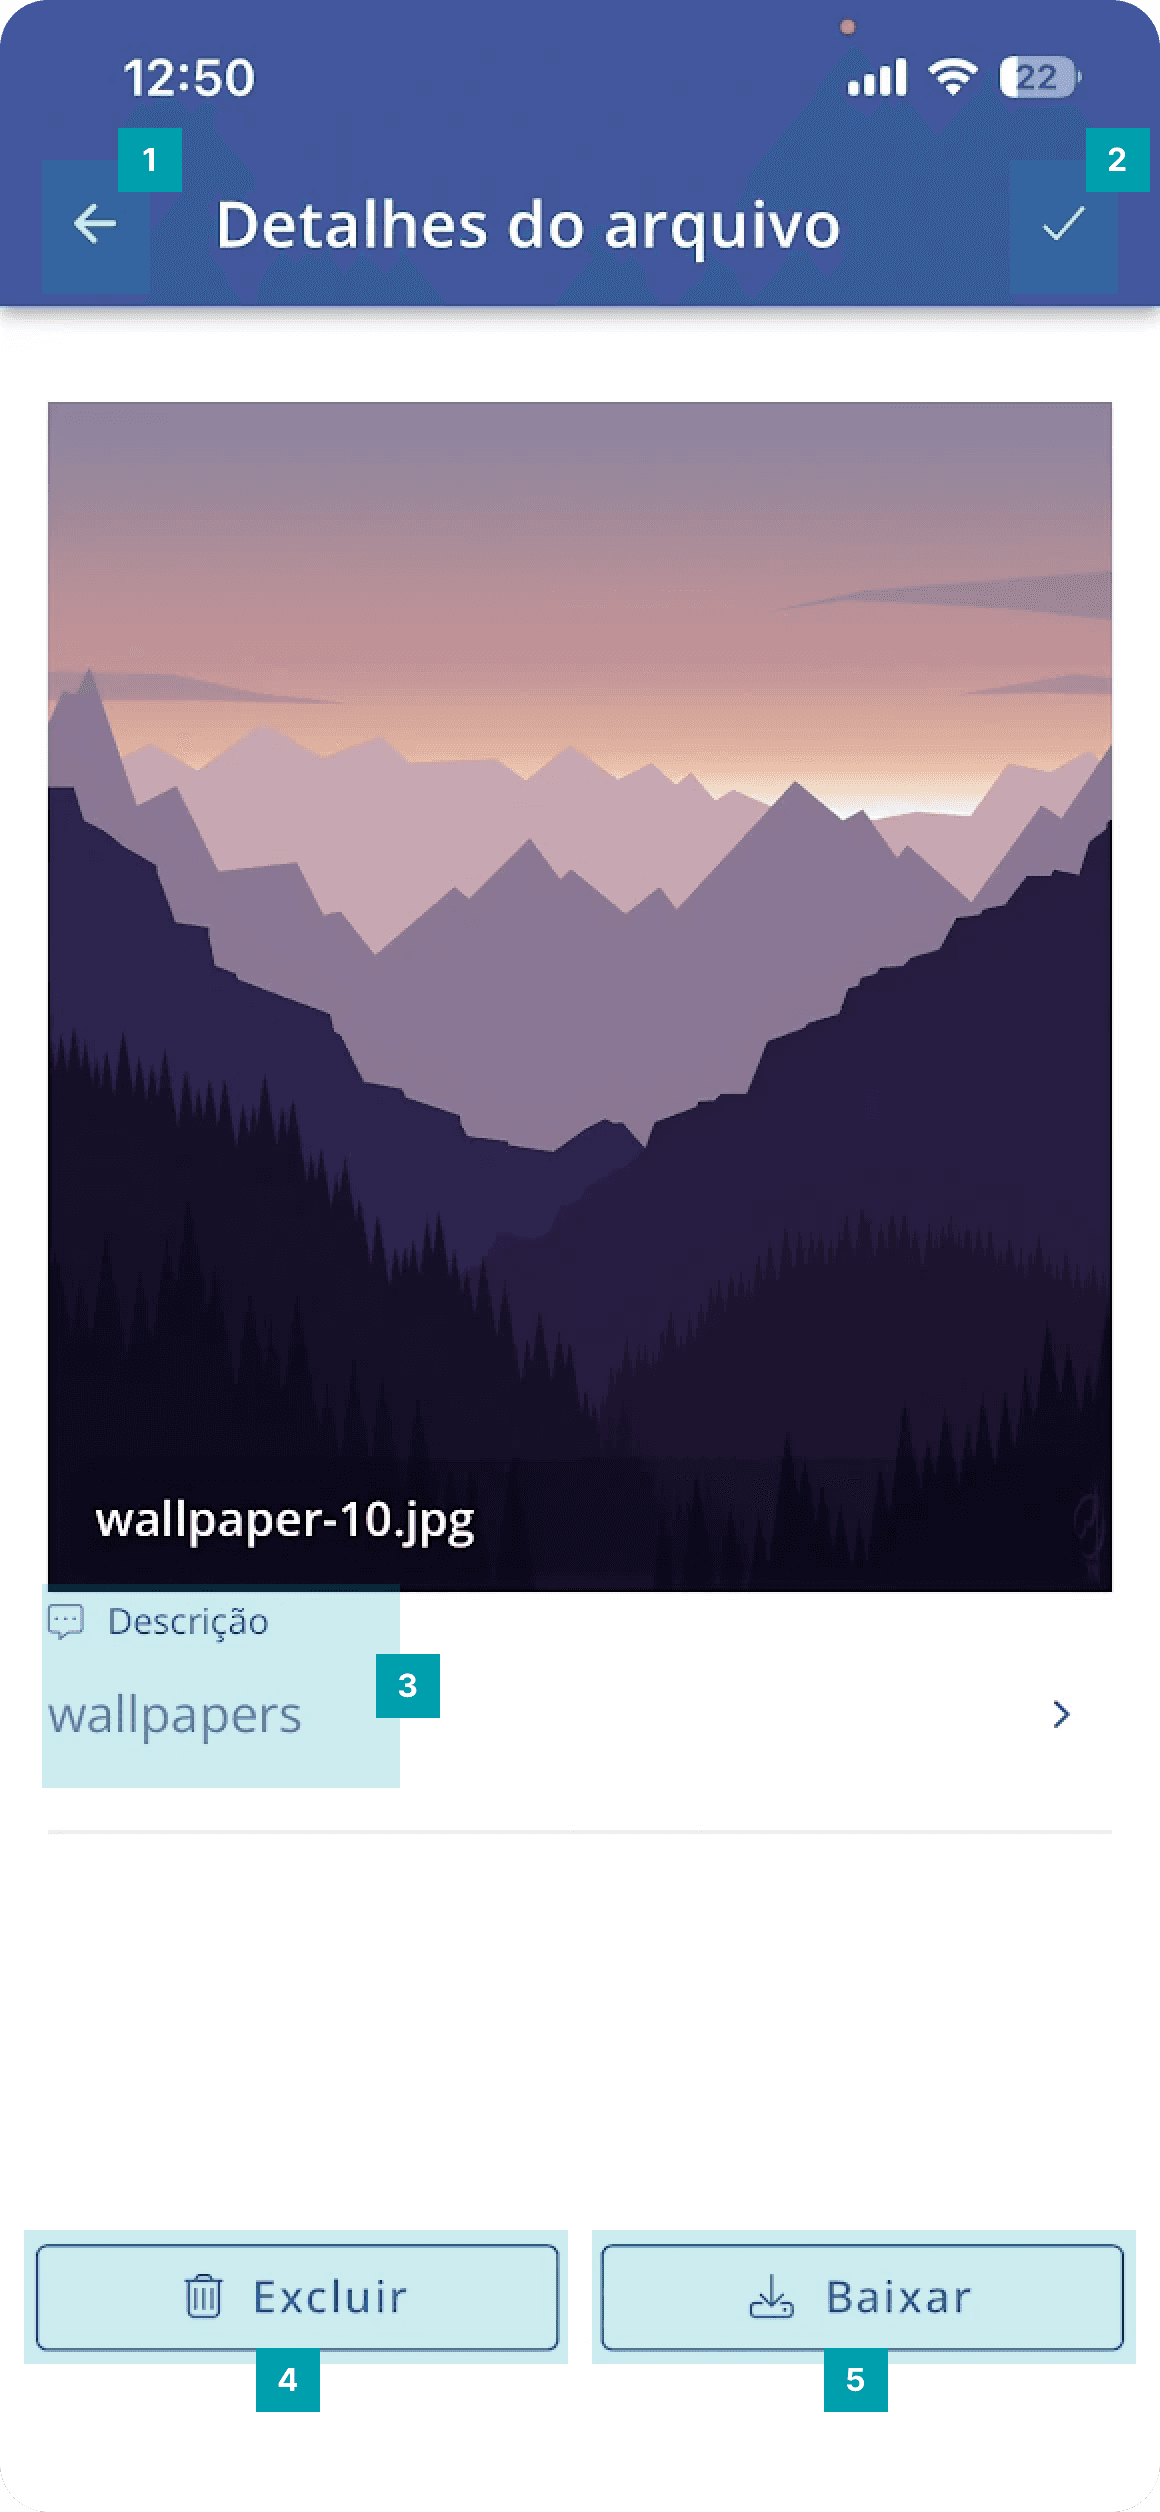
When you click a file, you will be redirected to the file details screen with the following information:
Back – when clicked, returns to the previous modal, displaying all activity files.
Confirm – when clicked, file information will be saved
Description – allows including a description for the file
Delete – when clicked, allows deleting the file
Download – when clicked, the file is instantly downloaded to the device
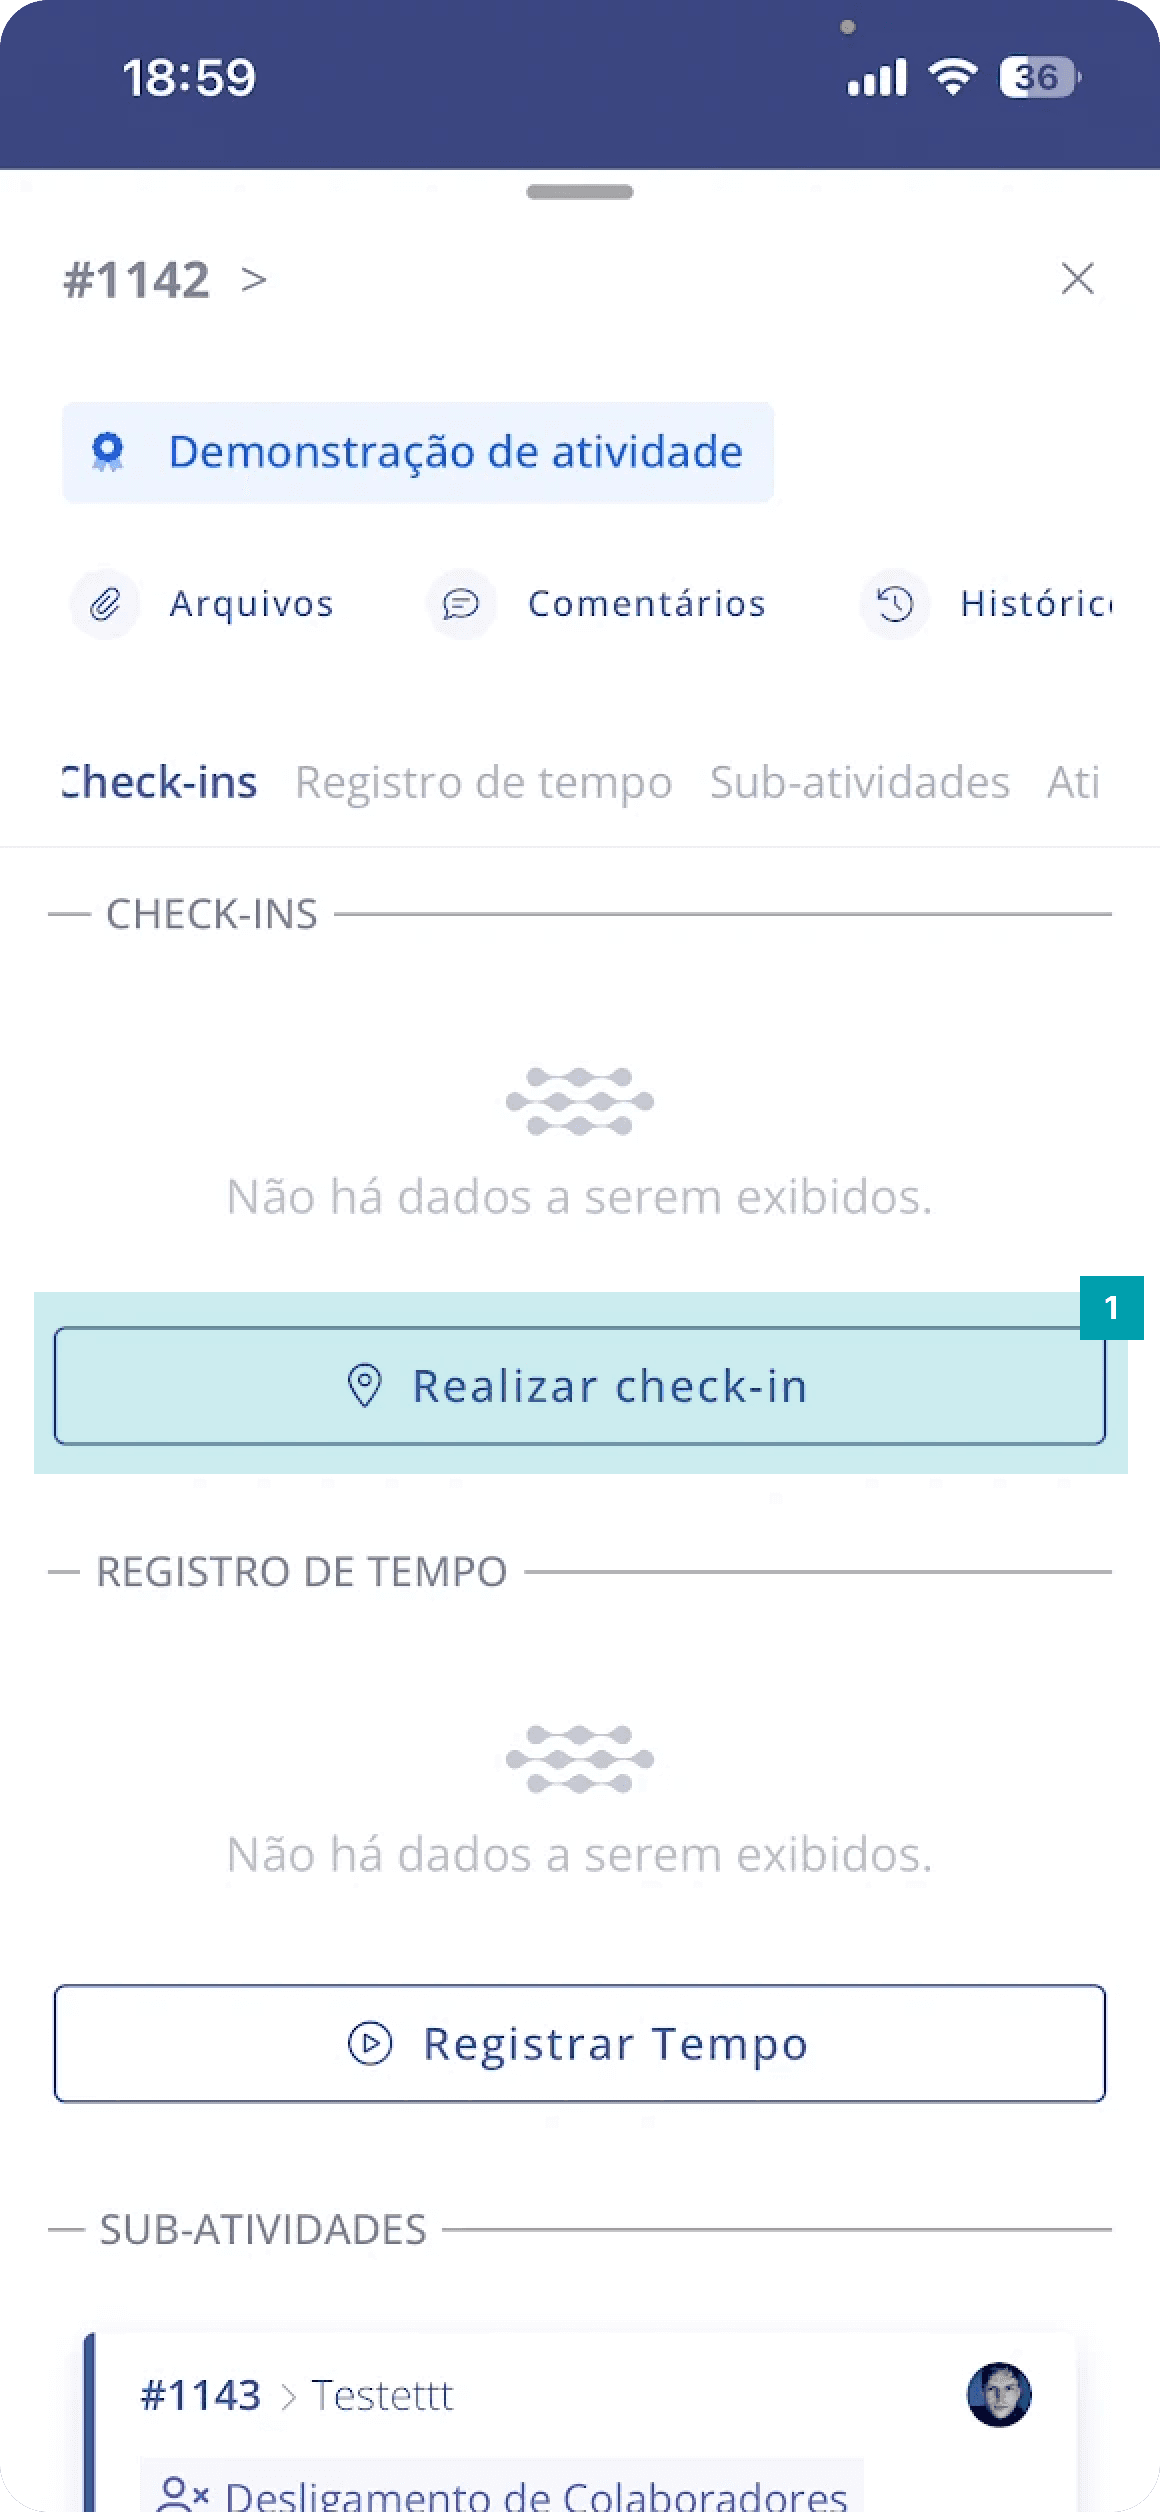
Check-ins panel
Performing check-in and check-out is an extremely important function for day-to-day remote operations. This panel’s main function is monitoring and creating evidence, providing complete information on the user’s location, ideal for professionals who provide external services. Performing a check-in is very simple; let’s see:
Perform check-in – by clicking the button, a new check-in will be inserted. Our system automatically fetches your location and documents it in the activity for you.
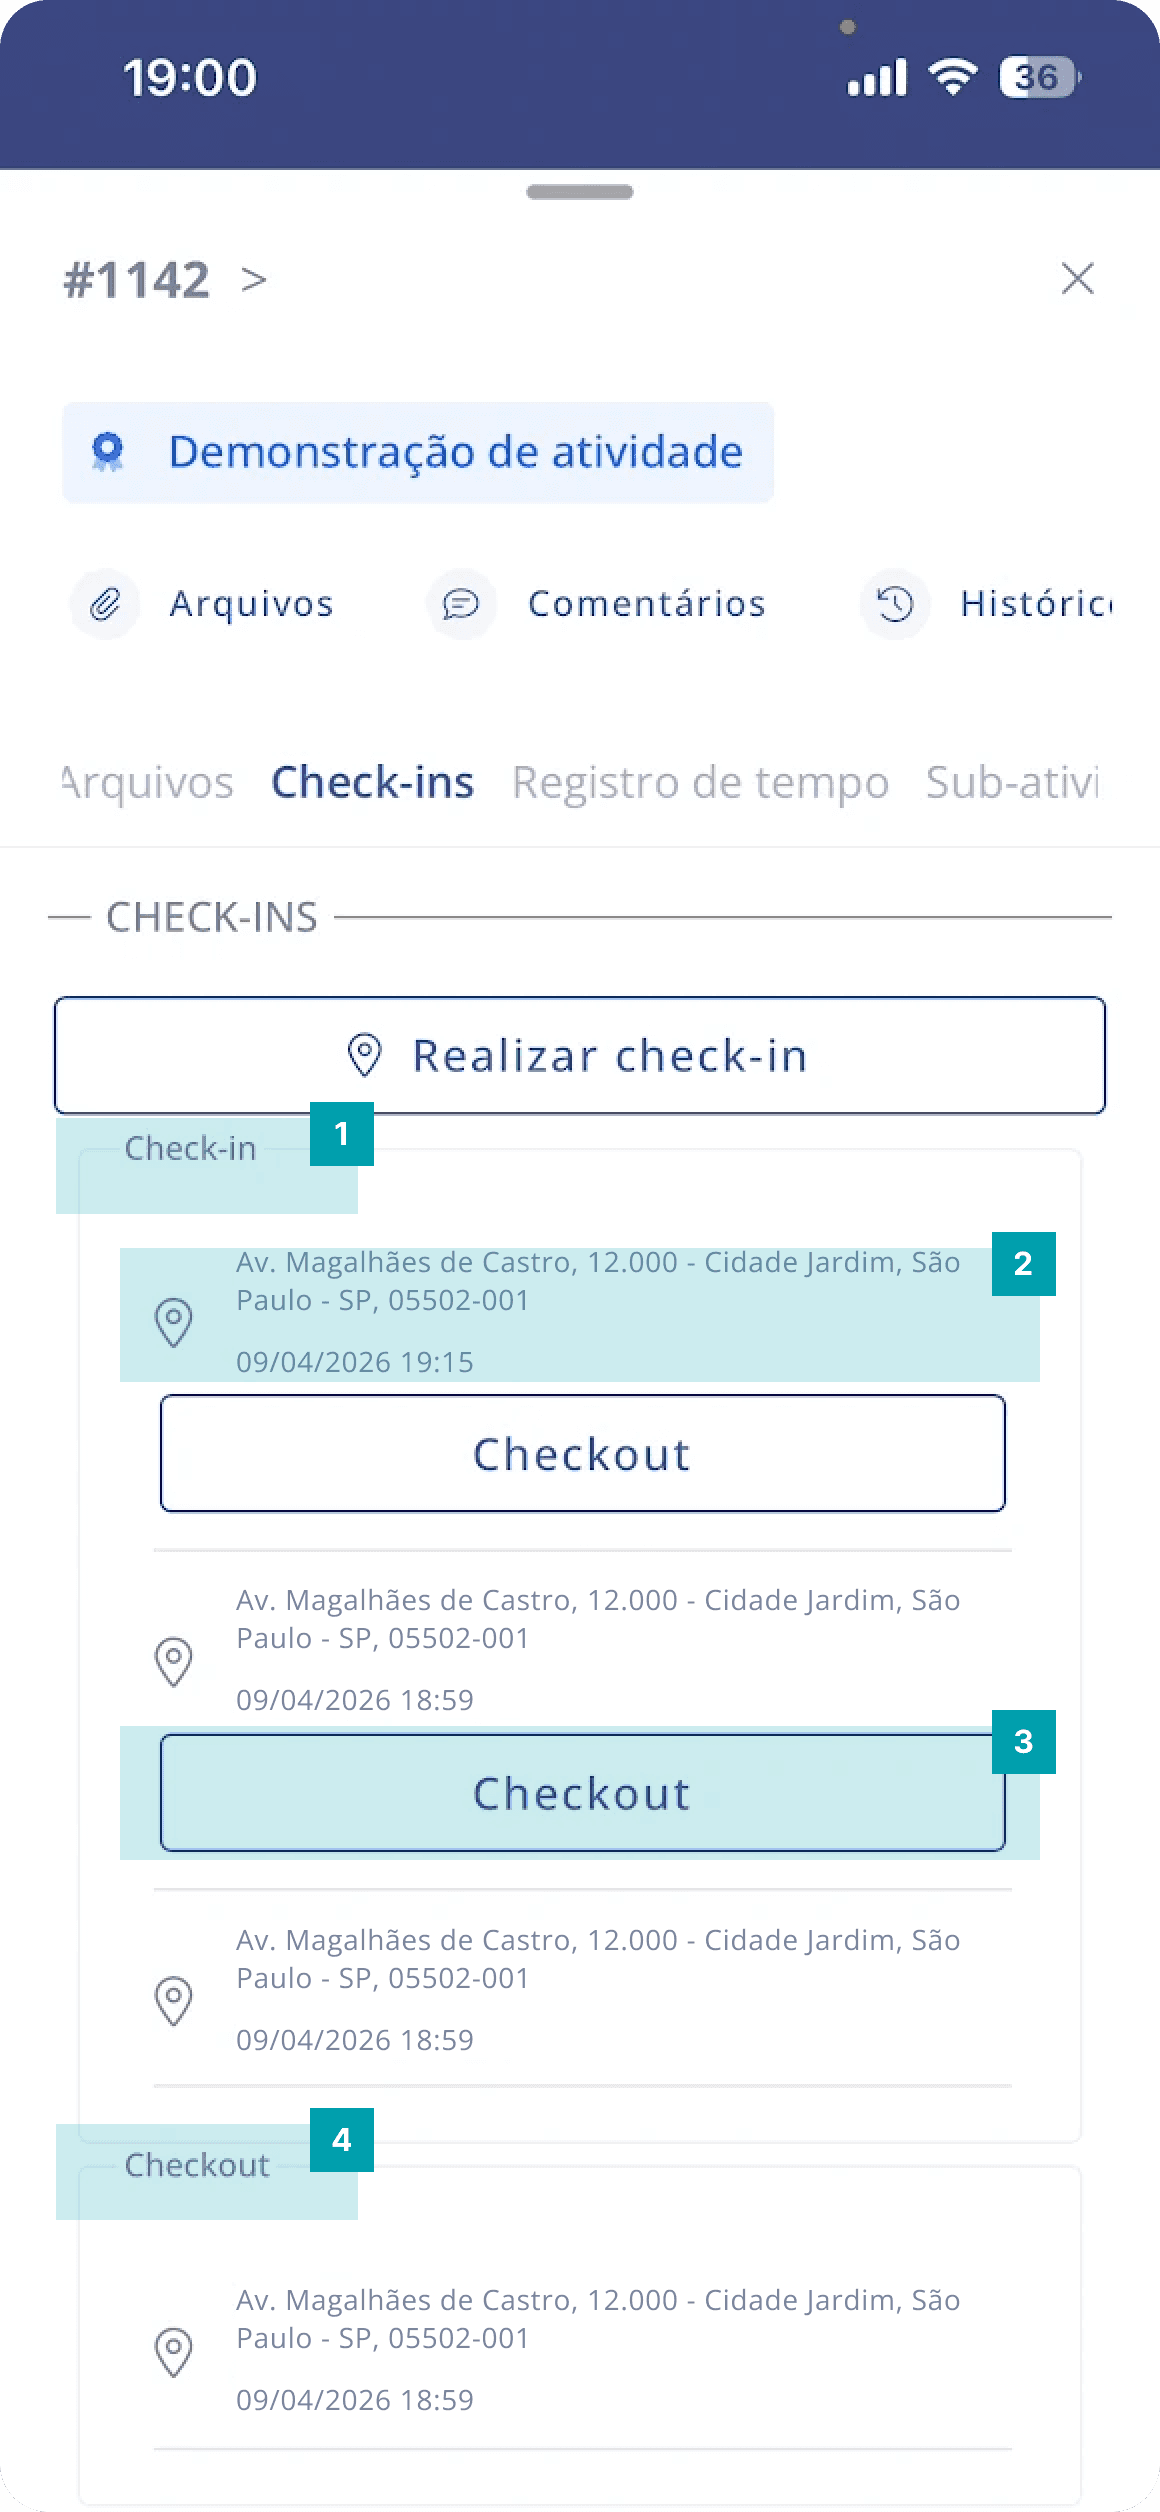
Check-ins block – this block displays all check-ins made in the activity
Check-in – here are the check-in details, such as location, date, and time
Check-out – when clicked, a check-out will be performed on the selected check-in
Check-outs block – this block displays all check-outs made in the activity